As a motorcycle owner, you know the importance of keeping your ride in good condition. And one part that is often overlooked but can cause major complications if it fails? The rectifier! Make sure to check regularly and take precautions to keep this essential component running properly for an enjoyable ride ahead.
To ensure the proper functioning of a motorcycle and avoid potential complications in the future, it is essential to test a motorcycle rectifier. A rectifier transforms AC power generated by an alternator into DC current to charge up the battery and power all electrical components on board. In this blog post, we’ll discuss practical ways to do that!
With the help of a digital multimeter, you can easily test your motorcycle’s rectifier. This device is used to measure electrical currents and their values. To find out if current regulation is occurring as well as whether AC power has been converted into DC, use this tool by measuring both the positive diode and negative diode value outputs.
I understand that this information might not be of much help to you, so here is a clear and concise guide on how to test a motorcycle rectifier with a multimeter. Follow the instructions below for an easy-to-understand tutorial!
Quick Navigation
What Is A Rectifier?
Even if you’re searching this up, it’s possible that you don’t have a full grasp of the rectifier. Therefore, I’m going to elucidate exactly what its purpose is and how it functions. After all, there’s no way for us to troubleshoot or repair something without understanding precisely how it works!

The rectifier regulator is an essential component of any electrical system, converting the AC power generated by the stator coils into DC power while simultaneously regulating current flow. Without this critical component present, your battery will not charge and you risk damaging it with excessive currents; a faulty rectifier can even lead to overcharging. Protecting your battery’s health requires a functioning rectifier regulator!
So, there you go, a component that has two functions, it rectifies and regulates currents. Therefore, it’s called a regulator rectifier. Usually, it’s located near the radiator, but it depends on the bike model. Check your manual to locate it.
How to Test A Motorcycle Rectifier With A Digital Multimeter
Before we delve in, there are a couple of warnings. You’ll be dealing with an electrical system and it should not be taken lightly – you may get an electric shock if you don’t know what you’re doing!
If that’s the case for you, please seek out a technician to perform the same test instead. This is not something anyone can or should try without safety precautions in place! Also, you will need a digital automotive multimeter.
- Remove the rectifier block. Check your bike’s manual to find out where the rectifier block is located. You shouldn’t have a problem taking it out. Try finding a YouTube tutorial for your exact model. If you can’t even find the rectifier, you shouldn’t do this. It’s better to go to an expert for the first time. After that, you will know how to do it.
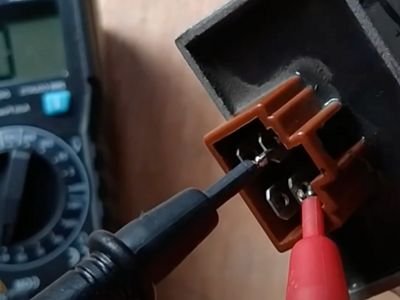
- Set the multimeter to the diode function.
- Connect the multimeter’s positive cable to the positive diode. Then, connect the negative terminals to the stator coils/inputs. The multimeter should not show any readings. If it shows any reading up to this point, that’s a bad rectifier.
- Connect the negative terminal to the positive diode, and then the positive terminal to the stator coils. You may get something here on the multimeter but pay no attention. It doesn’t matter that much, it’s bad if there are readings on step 3.
- Connect the positive probe to the negative diode, then the negative probe to the stator coils. You shouldn’t get readings here again. If the multimeter shows something here, you may have charging problems caused by a bad rectifier.
Testing A Regulator With a Multimeter
This one is a bit easier, you don’t have to access something that’s hard-to-get-to. You will just be dealing with the battery. Basically, we’ll be testing how well the battery is being charged.
- Set the multimeter to DC voltage.
- Start your bike.
- Connect the probes with the battery terminals. Most automotive multimeters come with two black cables that have a ‘+’ or ‘-‘ sign inscribed. But some have a red and a black cable. If you have one of those, the red cable goes to the positive terminal.
- Check the reading. While your bike is idling the battery should be showing readings of 12-13 volts. Anything lower than that means the battery is not charging. Anything higher means your battery is being overcharged.
- Rev your engine. Give one or two strong twists to the throttle.
- Check the readings again. Immediately after revving the engine, the readings should be a bit higher. Around 13.5 volts to 14 volts. This is the normal range. If the readings are the same after revving, you may have a bad alternator. Anything higher than the average means the battery is overcharging.
There you go. That’s how to test the rectifier portion and the regulator. If the meter is showing readings outside the average range, you need to fix something.
What Can Cause a Regulator Rectifier to Go Bad?
You may be wondering: What caused this? The rectifier is not something that needs maintenance. So, I understand how some of you may be surprised. Well, it does not have anything to do with you. At least, negligence on your part can’t be the cause.
Rectifiers mostly fail because of overheating. As I said, most rectifiers can be placed near radiators. So, that heat may be too much for the rectifier. This usually happens when the parts that surround the rectifier produce too much heat.
Another reason why rectifiers overheat is the battery. Any bad groundings or bad connections can mess with the current and overheat the rectifier regulator.
What are the symptoms of a bad motorcycle rectifier
- Cold starts: Depends on how bad the situation is. The battery may be draining, so you will get some cold starts. Eventually, the battery will die.
- Dimmed headlights: This may be harder to notice, especially during the day. Check the headlights as soon as you start your bike. While you are riding the battery may charge a bit so the headlights will lighten up.
- Extra bright headlights: If the battery is overcharged, then the headlights may get extra bright.
- Electrical components failing: The excess power will start messing with the electrical system. Bulbs will start dying.
Can You Repair A Rectifier?
Taking all this information into account, you’re probably thinking about attempting to repair the rectifier. Unfortunately, it’s not worth spending time and money on repairing one – instead, your best bet is to simply purchase a new one. Fortunately, replacements are usually fairly inexpensive; from $20-$100 depending on where you buy it from.
If the rectifier has caused extensive damage, unfortunately, you will face a higher cost. We have already mentioned how a malfunctioning rectifier regulator can harm your electrical components and even lead to battery replacement if neglected.
Thus, it’s essential that any signs of failure are detected promptly in order to avoid spending money on extra repairs or replacements.
How to replace a rectifier on a motorcycle?
Performing a rectifier replacement on a motorcycle may not seem complicated, but it’s important to have the right instruments and take precise steps to ensure that you don’t inadvertently damage any other parts.
Here’s a step-by-step guide on how to replace a rectifier on a motorcycle:
- Identify the location of the rectifier. The rectifier is usually located near the battery or the alternator, depending on the motorcycle’s make and model.
- Disconnect the battery to prevent any electrical shocks or short circuits.
- Remove the old rectifier. This can involve removing any mounting bolts, screws or clips holding the rectifier in place. If the rectifier is attached to a heat sink, you may need to remove the heat sink as well.
- Disconnect the wires from the old rectifier. The wires will be connected to the rectifier with either a connector or bolts, depending on the make and model of the motorcycle.
- Connect the wires to the new rectifier. Ensure that you connect the wires to the correct terminals. The terminals may be labeled, or you can refer to the service manual for your motorcycle for guidance.
- Mount the new rectifier. Place the new rectifier in the same location as the old one and use the same bolts, clips, or screws to secure it in place.
- Reconnect the battery and start the motorcycle to test the new rectifier’s functionality.
It’s essential to remember that some motorcycles may come with a combined regulator-rectifier. If any of the two components fail, you’ll be required to replace both parts at once.
Additionally, if you’re not confident in your ability to replace the rectifier yourself, it’s always best to consult a professional mechanic to ensure that the replacement is done correctly.
Frequently Asked Questions (FAQs)
Will A Motorcycle Start With A Bad Rectifier?
No, a motorcycle will not start with a bad rectifier. A faulty rectifier will cause the battery to drain and eventually die, preventing your bike from starting up.
Does A Bad Rectifier Affect The Lights?
Yes, a bad rectifier can affect your lights by either dimming or overcharging them. It’s important to check.
What causes a rectifier to burn out?
A rectifier may burn out due to a high voltage spike, or from excessive current passing through it. Additionally, the rectifier can fail due to aging and wear and tear over time. It’s important to regularly check your rectifier for any signs of damage or failure.
Conclusion
In conclusion, it only takes a few simple steps to test a motorcycle rectifier. Whether you’re an experienced enthusiast or a newcomer to the field, always remember to use caution and keep safety on top of your mind when working on your bike.
If you find yourself feeling overwhelmed at any point throughout the process, don’t hesitate to seek professional mechanic assistance.

Paul's love for motorcycles started at a young age, and he spent most of his teenage years tinkering with bikes in his garage. As he grew older, his passion for motorcycles only intensified, and he began exploring different types of motorcycles and taking long road trips to different parts of the country.
- Unveiling the Honda Ruckus Top Speed and its Thrilling Performance - June 20, 2023
- Unveiling the Mystery: What is a Bobber Motorcycle? Unleash the Essence of Raw Power and Timeless Style! - May 26, 2023
- Maintenance Tips for Your Enduro Electric Bike: Essential Guide for Optimal Performance - May 23, 2023